wikipedia

Support Wikipedia

Friday, March 27, 2015

Accessing samba bookmarks from linux command line

You can setup bookmarks to any folder on a host running samba with something like this
smb://DOMAIN-NAME;username@host/folder-name/

After providing the credentials. you can browse through the folder on file explorer(for example nautilus on ubuntu).

To access the same from command line, you don't need to mount any network drives, it's already mounted for you.


Try

ls -l /var/run/user/1001/gvfs/

where 1001 happens to be the folder assigned for my user id.Yours could be different.

This should list all the samba shares that are active.

$ ls -l /var/run/user/1001/gvfs/
total 0


drwx------ 1 myuser myuser 0 Mar 19 11:07 smb-share:domain=mydomain,server=host,share=,user=myuser
drwx------ 1 myuser myuser 0 Feb 16 13:29 smb-share:domain=mydomain,server=host,share=,user=myuser


To access the different shares all you have to do is cd to it. That's it, job done.

Monday, October 22, 2012

post-download-artifact or post-retrieve-artifact trigger?

Are you having a problem with ivy post-download-artifact trigger? Is the ant call target not firing for you? Then read on.

Here is a sample post-download-artifact trigger for handling a zip artifact.
<triggers>
  <ant -call prefix="dep" target="unzip"          
event="post-download-artifact" filter="type=zip"/>
  </ant>
</triggers> 


Maybe the post-download-artifact event is not firing because the artifact is being fetched from the cache and not getting downloaded from a repository. Well, in that case, post-retrieve-artifact is the solution for you. post-retrieve-artifact will fire after getting the artifact either from a download or from the local cache. Problem solved.

Now does it make post-download-artifact redundant? Yes of course! So you better replace all the post-download-artifact ivy triggers in ivysettings file to post-retrieve-artifact triggers. That will take care of the issue.

This was discovered by my brilliant co-worker Mike. You can browse his blog here.

Thursday, September 13, 2012

Improving performance of Jenkins

Jenkins slows down over a period of time. Builds start taking more time than usual. The start up time increases to manifolds. You may wonder that throwing in more memory to the Jenkins process or making the JVM process do garbage collection frequently, etc might make it better. But if that doesn't do the trick, then read on.

One way to check if builds in Jenkins are taking a long time is by running them outside of Jenkins. if you see a considerable difference in the times then Jenkins may be slowing down.

Here is a white paper on optimizing Jenkins written by it's creator with some really nice tips.

But in our case the real reason for the slow performance turned out to be the temp files! Jenkins creates a boatload of them, around 100s  (this depends on how many active jobs you have) each hour and doesn't bother to clean them up at all.

On windows platform  Jenkins writes to C:\Temp and on Linux it is /var/tmp. Luckily there is a plugin which can be configured to clean out these directories. For example you could setup the plugin to keep files which are a day old and get rid of the rest.

Try it out and see if that makes Jenkins sprint.

Sunday, September 9, 2012

Process Explorer for Windows

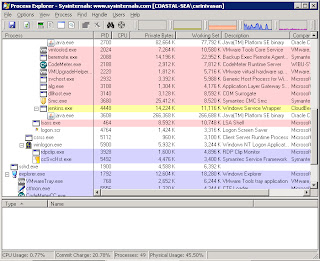
Task Manager has been the default process manager on windows systems for a long time and even today. Sysinternals, a company Microsoft acquired way back in 2006, has a suite of troubleshooting tools.The process monitor from Sysinternals called Process Explorer, is much more useful, cool and powerful than the good old windows Task manager.
You can see things like the runtime program directives, process tree and many more for a live process.
You could query a process, on which  files it has open or find out all processes that have a handle on a data file. Those are really helpful features for trouble shooting.

Here is a first look at process explorer


To look at the files that are used by a process, You can turn on process tree from the view menu.  Here is the process tree.


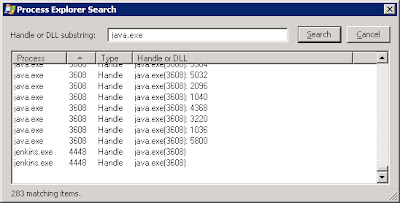
Further if you want to find the process holding on to a file then use the search feature and let's search for processes using java.exe

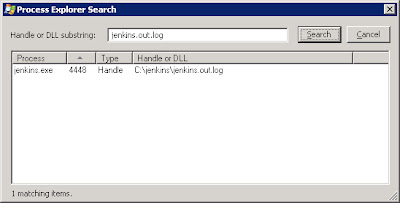
 That of course lists tons of processes. Now let's try a more refined search, for a log file.

There are many more useful features that you can explore further with Process Explorer. I always felt Process Explorer could be included  as part of the regular windows distribution!

Thursday, August 9, 2012

Overriding Ivy dependency

IvyDE (the eclipse plugin for Ivy) manages dependencies by automatically downloading them from the repository. It also attaches the sources(if they are available in the repository) to binaries under the hood without any custom settings. Helps to debug the source for any dependency.

That's great but what if you are working on multiple projects at the same time and want to test/debug the new code that you are writing in a dependency module.

One way to do that is to comment out the dependency(let's call it project X) entry in ivy.xml for X and then include the source for X by adding project X to the buildpath of the main project(let's call it project A).

Now if the dependency is used in multiple  projects(say B and C) and B and C are dependencies of project A,  then you have much more work to do.
Like
  • Comment out entries for projects B and C in project A's ivy.xml and then add project B and C to project A's build path.
  •  Comment out entries for X in project's B and C's ivy.xml
  • Add project X to the build path for projects B and C.

A quicker and much more cleaner alternative is to add the dependency (project X) to the main project's (A) buildpath and move the order of  X to the top of the classpath. In Eclipse IDE, this is available under "Order and Export" tab of "Java Build Path" menu under project properties. As shown in the picture below.


 You are done. Set a breakpoint within project X and see how it goes!


Thursday, May 31, 2012

Debugging dependency source with IvyDE

IvyDE an Eclipse plug-in for Ivy makes it a lot easier to work with Ivy. Some of the notable things that IvyDE does are automatic resolving of dependencies when ivy.xml is modified or the first time a project is loaded, ability to clear caches by providing a sub menu, Error checking/validation of ivy configurations and so on.
 Once you install IvyDE and enable a project to use IvyDE for managing dependencies, you lose the ability to attach a source to any of the jars in the classpath. That makes it difficult to debug the source for any dependency. The crude way I was doing it was to comment out the said dependency in ivy.xml. Saving the file should trigger a resolve on the project. That should remove the dependency from the build path. Then add the desired project to the classpath.

I found out later that it doesn't have to be that way though. IvyDE provides a neat way out. Even though there are no examples of how exactly to setup configure. After numerous trials and errors I got it working. Hope somebody else who is trying to Debug source with Ivy finds this post useful enough.

I created a tutorial at the following location. Utility is the project which publishes a binary Utility.jar and Utility-source.zip artifacts. TRY-IVY-DEBUG is the project which uses Utility.jar and has a simple class Test.java that can be used to debug into the source.
 
 <configurations>
      <conf name="default" description="binary" />
      <conf name="sources" description="source codes" />
     </configurations>
     <publications defaultconf="default">
      <artifact name="Utility" type="jar" conf="default" ext="jar" />
      <artifact name="Utility-sources" type="source" conf="sources" ext="zip" />
     </publications>
     <dependencies/>
There are two configurations defined, default and source. The description attribute is self explanatory. The artifacts are Utility.jar and Utility-sources. The key here is type=”source”. That's one of the two things IvyDE is looking for when trying to bind the sources to the jars. The other requirement is that the source artifact name suffix needs to match the ones in default IvyDE configuration as shown below.
If you load the two projects mentioned above in eclipse. Build the Utility project using the included build.xml and perform a resolve on the TRY-IVY-DEBUG project. That should make eclipse download and attach the Utility-sources.zip to the Utility.jar artifact.You should now be able to debug Test.java class and step into the attached source.

Sunday, March 18, 2012

Publishing to a branch using Ivy

Ivy off the shelf works fine if you are not dealing with branches. The examples in the samples that can be downloaded don't have much for using branches. That's because branches are optional for Ivy. All it cares about is the module name and revision number for getting the last build number or publishing an artifact to the repository.

If you can live without branches then things are fine with Ivy as a dependency manager. But life is not that simple! Once I started using branches everything went haywire. Because I had not made the configuration changes in all the right places. Having figured it out the hard way, would like to share the list of fixes.
The things to do when configuring ivy for branches are
  •  Include branch attribute in artifact and ivy pattern. Like shown below here
   ivy.artifact.pattern=[organisation]/[module]/[branch]/[revision]/[artifact].[ext]
   ivy.pattern=[organisation]/[module]/[branch]/[revision]/ivy.xml
  • Set default branch attribute in ivysettings file as shown below.
<ivysettings>
  <properties file="ivysettings.properties"/>
  <settings defaultCacheDir="${ivy.settings.dir}/ivy-cache" defaultBranch="trunk" defaultResolver="chain" latest="latest-compatible"/>  
   <resolvers>
      <chain name="chain">
          <url name="projects">
              <artifact pattern="http://buildserver/${repository.dir}/${ivy.artifact.pattern}" />
            <ivy pattern="http://buildserver/${repository.dir}/${ivy.pattern}" />
        </url>
        <ibiblio name="libraries" m2compatible="true" usepoms="false" /> 
        <ibiblio name="java-net-maven2" root="http://download.java.net/maven/2/" m2compatible="true" />
      </chain>
  </resolvers>
  
</ivysettings> 

  • Specify branch attribute in ivy.xml under the info section.
<ivy-module version="1.0">
    <info 
        organisation="org.coastal"
        module="mymodule"
        branch="RB-1.0.0"
        status="integration"
        revision="1.0"/>

    <publications/>
    <dependencies/>    
</ivy-module> 

  • Make sure the buildnumber ivy target has branch parameter too. Like shown below.
<target name="ivy-new-version" depends="" unless="ivy.new.revision">
 <!-- default module version prefix value -->
 <property name="module.version.prefix" value="${ivy.revision}." />
 
 <!-- gets next version number from ivy repository -->
 <ivy:info file="${ivy.file}" />

 <ivy:buildnumber 
  organisation="${ivy.organisation}" module="${ivy.module}" 
  branch="${ivy.branch}"
  revision="${module.version.prefix}" defaultBuildNumber="1" revSep=""/>
</target>

  • The publish ivy target has branch attribute as well.
<target name="publish-remote" depends="build" description="--> publish this project to ivy repository">
    <ivy:publish artifactspattern="${dist.dir}/[artifact].[ext]" 
           resolver="projects"
           pubrevision="${version}" 
           pubbranch="${ivy.branch}"
           update="true"
           status="${ivy.status}"
    />
<echo message="project ${ant.project.name} released with version ${version}" />
</target>