wikipedia

Support Wikipedia

Friday, March 27, 2015

Accessing samba bookmarks from linux command line

You can setup bookmarks to any folder on a host running samba with something like this
smb://DOMAIN-NAME;username@host/folder-name/

After providing the credentials. you can browse through the folder on file explorer(for example nautilus on ubuntu).

To access the same from command line, you don't need to mount any network drives, it's already mounted for you.


Try

ls -l /var/run/user/1001/gvfs/

where 1001 happens to be the folder assigned for my user id.Yours could be different.

This should list all the samba shares that are active.

$ ls -l /var/run/user/1001/gvfs/
total 0


drwx------ 1 myuser myuser 0 Mar 19 11:07 smb-share:domain=mydomain,server=host,share=,user=myuser
drwx------ 1 myuser myuser 0 Feb 16 13:29 smb-share:domain=mydomain,server=host,share=,user=myuser


To access the different shares all you have to do is cd to it. That's it, job done.

Monday, October 22, 2012

post-download-artifact or post-retrieve-artifact trigger?

Are you having a problem with ivy post-download-artifact trigger? Is the ant call target not firing for you? Then read on.

Here is a sample post-download-artifact trigger for handling a zip artifact.
<triggers>
  <ant -call prefix="dep" target="unzip"          
event="post-download-artifact" filter="type=zip"/>
  </ant>
</triggers> 


Maybe the post-download-artifact event is not firing because the artifact is being fetched from the cache and not getting downloaded from a repository. Well, in that case, post-retrieve-artifact is the solution for you. post-retrieve-artifact will fire after getting the artifact either from a download or from the local cache. Problem solved.

Now does it make post-download-artifact redundant? Yes of course! So you better replace all the post-download-artifact ivy triggers in ivysettings file to post-retrieve-artifact triggers. That will take care of the issue.

This was discovered by my brilliant co-worker Mike. You can browse his blog here.

Thursday, September 13, 2012

Improving performance of Jenkins

Jenkins slows down over a period of time. Builds start taking more time than usual. The start up time increases to manifolds. You may wonder that throwing in more memory to the Jenkins process or making the JVM process do garbage collection frequently, etc might make it better. But if that doesn't do the trick, then read on.

One way to check if builds in Jenkins are taking a long time is by running them outside of Jenkins. if you see a considerable difference in the times then Jenkins may be slowing down.

Here is a white paper on optimizing Jenkins written by it's creator with some really nice tips.

But in our case the real reason for the slow performance turned out to be the temp files! Jenkins creates a boatload of them, around 100s  (this depends on how many active jobs you have) each hour and doesn't bother to clean them up at all.

On windows platform  Jenkins writes to C:\Temp and on Linux it is /var/tmp. Luckily there is a plugin which can be configured to clean out these directories. For example you could setup the plugin to keep files which are a day old and get rid of the rest.

Try it out and see if that makes Jenkins sprint.

Sunday, September 9, 2012

Process Explorer for Windows

Task Manager has been the default process manager on windows systems for a long time and even today. Sysinternals, a company Microsoft acquired way back in 2006, has a suite of troubleshooting tools.The process monitor from Sysinternals called Process Explorer, is much more useful, cool and powerful than the good old windows Task manager.
You can see things like the runtime program directives, process tree and many more for a live process.
You could query a process, on which  files it has open or find out all processes that have a handle on a data file. Those are really helpful features for trouble shooting.

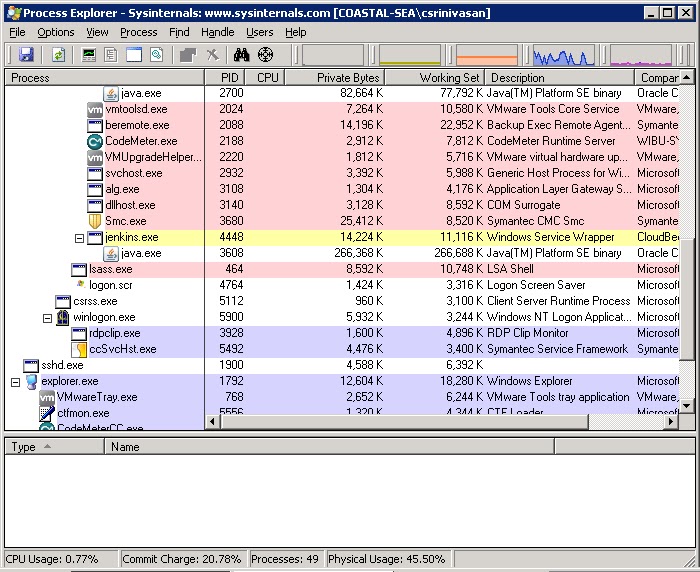
Here is a first look at process explorer


To look at the files that are used by a process, You can turn on process tree from the view menu.  Here is the process tree.


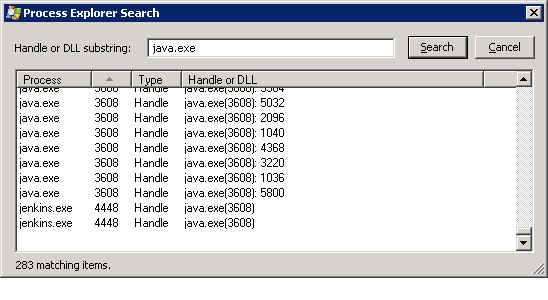
Further if you want to find the process holding on to a file then use the search feature and let's search for processes using java.exe

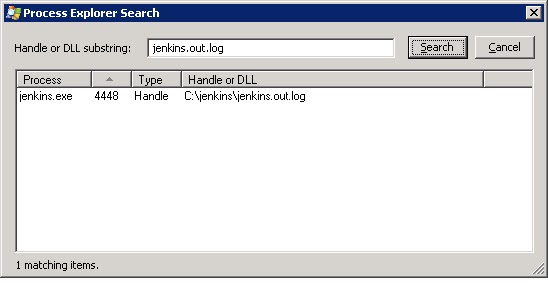
 That of course lists tons of processes. Now let's try a more refined search, for a log file.

There are many more useful features that you can explore further with Process Explorer. I always felt Process Explorer could be included  as part of the regular windows distribution!

Thursday, August 9, 2012

Overriding Ivy dependency

IvyDE (the eclipse plugin for Ivy) manages dependencies by automatically downloading them from the repository. It also attaches the sources(if they are available in the repository) to binaries under the hood without any custom settings. Helps to debug the source for any dependency.

That's great but what if you are working on multiple projects at the same time and want to test/debug the new code that you are writing in a dependency module.

One way to do that is to comment out the dependency(let's call it project X) entry in ivy.xml for X and then include the source for X by adding project X to the buildpath of the main project(let's call it project A).

Now if the dependency is used in multiple  projects(say B and C) and B and C are dependencies of project A,  then you have much more work to do.
Like
  • Comment out entries for projects B and C in project A's ivy.xml and then add project B and C to project A's build path.
  •  Comment out entries for X in project's B and C's ivy.xml
  • Add project X to the build path for projects B and C.

A quicker and much more cleaner alternative is to add the dependency (project X) to the main project's (A) buildpath and move the order of  X to the top of the classpath. In Eclipse IDE, this is available under "Order and Export" tab of "Java Build Path" menu under project properties. As shown in the picture below.


 You are done. Set a breakpoint within project X and see how it goes!


Thursday, May 31, 2012

Debugging dependency source with IvyDE

IvyDE an Eclipse plug-in for Ivy makes it a lot easier to work with Ivy. Some of the notable things that IvyDE does are automatic resolving of dependencies when ivy.xml is modified or the first time a project is loaded, ability to clear caches by providing a sub menu, Error checking/validation of ivy configurations and so on.
 Once you install IvyDE and enable a project to use IvyDE for managing dependencies, you lose the ability to attach a source to any of the jars in the classpath. That makes it difficult to debug the source for any dependency. The crude way I was doing it was to comment out the said dependency in ivy.xml. Saving the file should trigger a resolve on the project. That should remove the dependency from the build path. Then add the desired project to the classpath.

I found out later that it doesn't have to be that way though. IvyDE provides a neat way out. Even though there are no examples of how exactly to setup configure. After numerous trials and errors I got it working. Hope somebody else who is trying to Debug source with Ivy finds this post useful enough.

I created a tutorial at the following location. Utility is the project which publishes a binary Utility.jar and Utility-source.zip artifacts. TRY-IVY-DEBUG is the project which uses Utility.jar and has a simple class Test.java that can be used to debug into the source.
 
 <configurations>
      <conf name="default" description="binary" />
      <conf name="sources" description="source codes" />
     </configurations>
     <publications defaultconf="default">
      <artifact name="Utility" type="jar" conf="default" ext="jar" />
      <artifact name="Utility-sources" type="source" conf="sources" ext="zip" />
     </publications>
     <dependencies/>
There are two configurations defined, default and source. The description attribute is self explanatory. The artifacts are Utility.jar and Utility-sources. The key here is type=”source”. That's one of the two things IvyDE is looking for when trying to bind the sources to the jars. The other requirement is that the source artifact name suffix needs to match the ones in default IvyDE configuration as shown below.
If you load the two projects mentioned above in eclipse. Build the Utility project using the included build.xml and perform a resolve on the TRY-IVY-DEBUG project. That should make eclipse download and attach the Utility-sources.zip to the Utility.jar artifact.You should now be able to debug Test.java class and step into the attached source.

Sunday, March 18, 2012

Publishing to a branch using Ivy

Ivy off the shelf works fine if you are not dealing with branches. The examples in the samples that can be downloaded don't have much for using branches. That's because branches are optional for Ivy. All it cares about is the module name and revision number for getting the last build number or publishing an artifact to the repository.

If you can live without branches then things are fine with Ivy as a dependency manager. But life is not that simple! Once I started using branches everything went haywire. Because I had not made the configuration changes in all the right places. Having figured it out the hard way, would like to share the list of fixes.
The things to do when configuring ivy for branches are
  •  Include branch attribute in artifact and ivy pattern. Like shown below here
   ivy.artifact.pattern=[organisation]/[module]/[branch]/[revision]/[artifact].[ext]
   ivy.pattern=[organisation]/[module]/[branch]/[revision]/ivy.xml
  • Set default branch attribute in ivysettings file as shown below.
<ivysettings>
  <properties file="ivysettings.properties"/>
  <settings defaultCacheDir="${ivy.settings.dir}/ivy-cache" defaultBranch="trunk" defaultResolver="chain" latest="latest-compatible"/>  
   <resolvers>
      <chain name="chain">
          <url name="projects">
              <artifact pattern="http://buildserver/${repository.dir}/${ivy.artifact.pattern}" />
            <ivy pattern="http://buildserver/${repository.dir}/${ivy.pattern}" />
        </url>
        <ibiblio name="libraries" m2compatible="true" usepoms="false" /> 
        <ibiblio name="java-net-maven2" root="http://download.java.net/maven/2/" m2compatible="true" />
      </chain>
  </resolvers>
  
</ivysettings> 

  • Specify branch attribute in ivy.xml under the info section.
<ivy-module version="1.0">
    <info 
        organisation="org.coastal"
        module="mymodule"
        branch="RB-1.0.0"
        status="integration"
        revision="1.0"/>

    <publications/>
    <dependencies/>    
</ivy-module> 

  • Make sure the buildnumber ivy target has branch parameter too. Like shown below.
<target name="ivy-new-version" depends="" unless="ivy.new.revision">
 <!-- default module version prefix value -->
 <property name="module.version.prefix" value="${ivy.revision}." />
 
 <!-- gets next version number from ivy repository -->
 <ivy:info file="${ivy.file}" />

 <ivy:buildnumber 
  organisation="${ivy.organisation}" module="${ivy.module}" 
  branch="${ivy.branch}"
  revision="${module.version.prefix}" defaultBuildNumber="1" revSep=""/>
</target>

  • The publish ivy target has branch attribute as well.
<target name="publish-remote" depends="build" description="--> publish this project to ivy repository">
    <ivy:publish artifactspattern="${dist.dir}/[artifact].[ext]" 
           resolver="projects"
           pubrevision="${version}" 
           pubbranch="${ivy.branch}"
           update="true"
           status="${ivy.status}"
    />
<echo message="project ${ant.project.name} released with version ${version}" />
</target> 

Wednesday, December 21, 2011

Java 7 monitoring files/folders

Java 7 has this new watchservice which is a welcome development and you can read about it in many blogs as well as the oracle site. I tried playing with it using the code sample from some of the blogs. But unfortunately it seemed to work only the very first time and not after that.
Here is the code

public FileWatcher(String directoryPath) throws IOException {
        this.directoryPath  = directoryPath;
        FileSystem fileSystem = FileSystems.getDefault();
        watcher = fileSystem.newWatchService();
        
        Path myDir = fileSystem.getPath(this.directoryPath);
        myDir.register(watcher, StandardWatchEventKinds.ENTRY_CREATE, 
                  StandardWatchEventKinds.ENTRY_DELETE, StandardWatchEventKinds.ENTRY_MODIFY);
        monitorFolder();
} 
 
private void monitorFolder() {
  executor = Executors.newSingleThreadScheduledExecutor();
  executor.submit(this);
} 
 
public void run() {
  WatchKey watckKey = null;
  try {
   while(!shutdown ) {
    watckKey = watcher.take();
    events = watckKey.pollEvents();
    listener.processEvent(events);       
   }
  } catch (InterruptedException e) {
   logger.error("Error monitoring directory", e);
  }
} 

Some more beating around the bush and googling I discovered that the WatchKey needs to be reset for subsequent events to flow through to the listener.
Wonder why this strange behaviour. Anyhow here is the fix and after that everything was fine and dandy!

public void run() {
  WatchKey watchKey = null;
  try {
   while(!shutdown ) {
    watchKey = watcher.take();
    events = watchKey.pollEvents();
    listener.processEvent(events);
          
    watchKey.reset();   }
  } catch (InterruptedException e) {
   logger.error("Error monitoring directory", e);
  }
} 
 

Found out later by paying more attention(!!) to the article on the oracle site that resetting the watchkey is key
to getting future events.

Friday, September 23, 2011

Interleaving audio files to different channels

Audio files have inherent characteristics like number of channels, sample size, frame size, sample rate, file type, number of samples, etc. to quote a few.


Here is a nice description of  samples and channels from the java sound faq.

Each second of sound has so many (on a CD, 44,100) digital samples of sound pressure per second. The number of samples per second is called sample rate or sample frequency. In PCM (pulse code modulation) coding, each sample is usually a linear representation of amplitude as a signed integer (sometimes unsigned for 8 bit).  
There is one such sample for each channel, one channel for mono, two channels for stereo, four channels for quad, more for surround sound. One sample frame consists of one sample for each of the channels in turn, by convention running from left to right.
Each sample can be one byte (8 bits), two bytes (16 bits), three bytes (24 bits), or maybe even 20 bits or a floating-point number. Sometimes, for more than 16 bits per sample, the sample is padded to 32 bits (4 bytes) The order of the bytes in a sample is different on different platforms. In a Windows WAV soundfile, the less significant bytes come first from left to right ("little endian" byte order). In an AIFF soundfile, it is the other way round, as is standard in Java ("big endian" byte order).

Some more audio file fundamentals from the javadocs...

frameSize is the number of bytes in each frame of a sound that has this format.

sampleRate is the number of samples played or recorded per second, for sounds that have this format.

More definitions can be found here.
Audio files are made up of samples and samples are made up of bytes.
Audio files come in two types, mono and stereo. Mono files have only one channel (perhaps was recorded with one receiver). Stereo audio files can have from two to as many channels.

Mono audio files when played, samples from the single channel are automatically duplicated and sent to all the channels. For example if speakers are attached to a computer, that would be two channels.In the case of a stereo audio file, it is pre-recorded for multiple channels.

Now what if you want to interleave two different audio files into one audio file such a way that each audio file is played on separate channels. There are many possible use cases for doing that. One could be to get the remix effect. For example you can take a song and mix it with some background music or add some percussion effect. Of course there are many sophisticated audio software out there which can do this and much more. But the goal here is to demonstrate a simple java program to achieve interleaving of audio files.

Here I am going to take two mono audio files of the same format (wave file), encoding (PCM) and sample rate. Interleave them to produce another wave file with different audio playing on each channel.

I am using Java Sound API for this exercise. Java supports only AU, AIFF and WAV formats. Extensions/plug-ins for MP3 and other audio formats are available through 3rd party vendors.
The audio files used in this example are leftChannelAudio.wav and rightChannelAudio.wav

The format details for the audio files are

rightChannelAudio.wav

nbChannel = 1
frameRate = 44100.0
frameSize = 2
sampleSize(bits)= 16
nbSamples = 1105408
encoding = PCM_SIGNED
sample rate = 44100.0

leftChannelAudio.wav

nbChannel = 1
frameRate = 44100.0
frameSize = 2
sampleSize(bits) = 16
nbSamples = 1069056
encoding = PCM_SIGNED
sample rate = 44100.0

Here is the main method of the class.
public static void main(String[] args) {
        try {
            String soundFileLeft = "leftChannelAudio.wav";
            File fileLeft = new File(soundFileLeft);   // This is the file we'll be playing on the left channel.
            String soundFileRight = "rightChannelAudio.wav";
            File fileRight = new File(soundFileRight);
            
            float sampleRate = 44100.0f;
            int sampleSizeInBits = 16;
            int channels = 2;
            boolean signed = true;
            boolean bigEndian = false;
            AudioFormat targetFormat = new AudioFormat(sampleRate, sampleSizeInBits, channels, signed, bigEndian);
            AudioMixer mixAudio = new AudioMixer(fileLeft, fileRight, targetFormat);
            
            File outFile = new File("outSingleSingleMixer.wav");
            mixAudio.mixnWrite(AudioFileFormat.Type.WAVE, outFile);
        } catch(Exception e) {
            e.printStackTrace();
        }
    } 


The interleaving of audio bytes is done in mixIntoStereoAudio method as shown below.
 private AudioInputStream mixIntoStereoAudio(AudioInputStream leftAudioInputStream,
                                                AudioInputStream rightAudioInputStream) throws IOException{
        ArrayList byteArrays = new ArrayList();
        int nbChannels = 1;
        byte[] compiledStream = null;
        int leftAudioBytes = -1;
        int rightAudioBytes = -1;
        
        byteArrays.add(convertStream(leftAudioInputStream));
        byteArrays.add(convertStream(rightAudioInputStream));
        
        long maxSamples;
        if (leftAudioInputStream.getFrameLength() > rightAudioInputStream.getFrameLength()) {
            maxSamples = leftAudioInputStream.getFrameLength();
            nbChannels = leftAudioInputStream.getFormat().getChannels();
        } else {
            maxSamples = rightAudioInputStream.getFrameLength();
            nbChannels = rightAudioInputStream.getFormat().getChannels();
        }
        long maxOutputSizeinBytes = maxSamples * sampleSizeinBytes;
        if (nbChannels == 1)
            maxOutputSizeinBytes = maxOutputSizeinBytes * 2;
        
        compiledStream = new byte[(int) maxOutputSizeinBytes]; //max size of number of bytes
            
        log.info("Output bytes size: " + compiledStream.length);
        for(int i = 0; i < compiledStream.length; i += sampleSizeinBytes){
            leftAudioBytes = writeSamplestoChannel(byteArrays, 0,
                    sampleSizeinBytes, compiledStream, leftAudioBytes, i);
            
            i += sampleSizeinBytes;
            
            rightAudioBytes = writeSamplestoChannel(byteArrays, 1, 
                    sampleSizeinBytes, compiledStream, rightAudioBytes, i);
        }

        AudioInputStream newaudioStream = generateNewAudioStream(compiledStream);
        return newaudioStream;
    }


In this case the sample has two bytes.  In a stereo audio file samples are written out in the following fashion. First sample for left channel and second for right and so on.
This example uses a simple technique of filling a sample from each audio file for each channel respectively.Filling in silence value whenever we run out of samples from an audio file. This is because the two audio files being interleaved might not have the same number of samples.

This technique can be extended easily to handle stereo audio files or list of audio files for each channel.
Go ahead and run this program with the sample audio files provided or you can just listen to how the interleaved output file plays out.

The complete program and sample audio files are available here.

Some good resources on using Java Sound API are listed below.

http://www.jsresources.org/faq_audio.html
http://www.builogic.com/java/javasound-read-write.html

Friday, July 8, 2011

Routing Serial data to a socket

You don't need  a hardware device (like Lantronix adapter) to route data from a Serial port to a socket. Thanks to socat, you can relay data from a serial port to another or serial port to a socket or socket to socket and plenty more such combos, all in one line! socat is exhaustive in what it can take as arguments. Check it out.

Here is an example of making available data from serial port /dev/ttyS0 on a linux environment (usually this is COM1 on windows boxes) through a socket (port = 8023).

socat TCP-LISTEN:8023,fork /dev/ttyS0,raw,b9600,echo=0

The baud rate specified here is 9600. fork option lets you make multiple connections to the source of data, which in this case is the serial port.

You can verify the data  from the socket by using a telnet or similar application.


telnet localhost 8023


Thursday, June 2, 2011

Monitoring data from a Serial port

Serialports have gone out of vogue! You no longer get serial ports on a computer except on Desktop PCs, unless you custom order it. Notebooks/Laptops, no such luck. But there there are many people and companies which deal with serial ports on a daily basis.

In the windows world we had the good old Hyperterminal program which was shipped with all windows distributions until recently.  Now Hyperterminal is a payware utility and can be purchased separately. No free utility available out there for windows!  But then in the linux world, things are friendlier. There is minicomm and many more free utilities that come with the operating system.

Well the point of this blog post is not to berate windows or anything. Just wanted to share a way you could look at the data coming in from a serial port without downloading/purchasing any  software. This is very handy for troubleshooting, say if you are looking for any control characters or any noise in the serial line, etc.All this while an app is running using the serialport. This can be done outside the app space to monitor activity on a serial port.
To see the data from a serial port on command line as well as save it to a file here is what you can do.

The script command writes data from a terminal to the specified output file.

script -af serialOut.txt

hexdump reads from a serial port and prints out the bytes in hex and ASCII

hexdump -vC /dev/ttyS0

Here is what the whole thing looks like after executing the commands above...

The top window shows the output from the terminal and the bottom one shows the contents of the output file in real time.

You can do this and much more on a windows platform too! By installing cygwin and running linux commands within the cygwin environment.

Friday, March 18, 2011

Advanced Installer - Changing the package Install Drive

The default drive for installing an application on a windows system is C.  In fact on launching the .msi or .exe installer file it does show you the complete path where the package will be installed. but if you preset the drive to say D on the .aip file, the msi installer chokes on boxes where there is no D drive.

The fix here is to create some custom action and execute the custom action as part of the install/uninstall sequence. See the custom action screen snapshot below.

Here we set the value for APPDIR property pointing to D drive if the condition D_DRIVE holds true. The INSTALL_DIR property is set in the Install parameters tab as shown below.


Last but not the least is defining the D_DRIVE condition.


Following the above steps should enable you to install on D drive or for that matter any drive  (if it exists) by default.

Wednesday, January 19, 2011

Unable to login to Ubuntu. Screensaver unresponsive!

Generally I don't power off my machine at the end of the day or for that matter anytime unless there are updates that prompt me to restart. Also I leave firefox ON with 10-15 tabs! So the system is ON for weeks sometimes even a month or two! Ofcourse some of the processes start getting slower and slower. especially Firefox. But then all I need to fix that is to restart Firefox.
But in the last 6 months or so I have been encountering this weird problem.
when I come to work the next day...many times I couldn't get to the login dialog screen, no matter how hard I tried with the mouse or keyboard. Seemed like the gnome screen saver had gone into the weeds! The machine was ON and everything was running. The solution to this is to login through a command line session CTRL-ALT-F6 and kill the gnome-screen saver process. I used top utility to find the process id (look for gnome-screensaver in the command column) and also kill it. and then try ALT-F7 and everything is fine.

Wednesday, July 14, 2010

SOAP vs REST in Java land

SOAP and REST are the two most popular web service technologies in use today. REST has become the more preferred one, since it deals directly with URIs and can handle requests in plain text directly over HTTP. Testing it with a browser or tools like curl is super easy.

Let's go through some examples here. Since our focus is on the Java landscape.All the examples are in the Java environment.
The development environment I used is eclipse 3.5, Ubuntu 10.04 LTS the Lucid Lynx, JDK 1.16.20

With Java annotations kicking off in big style with Java 5. Now the coolest way to develop a web service is by using POJOs and some sprinkling of annotations here and there.

Let's start with a simple Java class (POJO) and make a web service out of it!


Let's take the same Java class (CalcWSImpl.java and Calculator.java are pretty much identical except for the annotations) and setup a web service using SOAP as well as REST.

Developing a SOAP based web service

There are many nice tools available today bundled with the JRE like wsimport, wsgen to generate web service client source code and wrapper classes to build a web service.

We start with a simple class Calculator.java. see the listing below.


This class already has the following JAX-WS annotations...

@WebService - to identify itself as an endpoint class.

@SOAPBinding(style=SOAPBinding.Style.RPC) – style for messages used in a webservice.

@WebMethod – to expose the method as a webservice operation.

For a complete list of all the JAX-WS annotations refer to JAX-WS annotations
Just with these annotations , we are ready to expose this class through a web service.

Take a look at TestCalc.java, which launches a web service.

package org.webservice.server;

import javax.xml.ws.Endpoint;

public class TestCalc {

        public static void main(String[] args) {
            Calculator calcWS = new Calculator();
            
            Endpoint.publish("http://localhost:8085/calc", calcWS);
        }

}

Run it and you have a running webservice at http://localhost:8085/calc.
The wsdl is available at http://localhost:8085/calc?wsdl

This is what the generated .wsdl looks like.

<?xml version="1.0" encoding="UTF-8"?><!-- Published by JAX-WS RI at http://jax-ws.dev.java.net. RI's version is JAX-WS RI 2.1.6 in JDK 6. --><!-- Generated by JAX-WS RI at http://jax-ws.dev.java.net. RI's version is JAX-WS RI 2.1.6 in JDK 6. --><definitions xmlns:soap="http://schemas.xmlsoap.org/wsdl/soap/" xmlns:tns="http://server.webservice.org/" xmlns:xsd="http://www.w3.org/2001/XMLSchema" xmlns="http://schemas.xmlsoap.org/wsdl/" targetNamespace="http://server.webservice.org/" name="CalcWS">
<types></types>
<message name="div">
<part name="arg0" type="xsd:int"></part>
<part name="arg1" type="xsd:int"></part>
</message>
<message name="divResponse">
<part name="return" type="xsd:float"></part>
</message>
<message name="add">
<part name="arg0" type="xsd:int"></part>
<part name="arg1" type="xsd:int"></part>
</message>
<message name="addResponse">
<part name="return" type="xsd:int"></part>
</message>
<message name="list"></message>
<message name="listResponse">
<part name="return" type="xsd:int"></part>
</message>
<portType name="Calc">
<operation name="div" parameterOrder="arg0 arg1">
<input message="tns:div"></input>
<output message="tns:divResponse"></output>
</operation>
<operation name="add" parameterOrder="arg0 arg1">
<input message="tns:add"></input>
<output message="tns:addResponse"></output>
</operation>
<operation name="list">
<input message="tns:list"></input>
<output message="tns:listResponse"></output>
</operation>
</portType>
<binding name="CalcWSPortBinding" type="tns:Calc">
<soap:binding transport="http://schemas.xmlsoap.org/soap/http" style="rpc"></soap:binding>
<operation name="div">
<soap:operation soapAction=""></soap:operation>
<input>
<soap:body use="literal" namespace="http://server.webservice.org/"></soap:body>
</input>
<output>
<soap:body use="literal" namespace="http://server.webservice.org/"></soap:body>
</output>
</operation>
<operation name="add">
<soap:operation soapAction=""></soap:operation>
<input>
<soap:body use="literal" namespace="http://server.webservice.org/"></soap:body>
</input>
<output>
<soap:body use="literal" namespace="http://server.webservice.org/"></soap:body>
</output>
</operation>
<operation name="list">
<soap:operation soapAction=""></soap:operation>
<input>
<soap:body use="literal" namespace="http://server.webservice.org/"></soap:body>
</input>
<output>
<soap:body use="literal" namespace="http://server.webservice.org/"></soap:body>
</output>
</operation>
</binding>
<service name="CalcWS">
<port name="CalcWSPort" binding="tns:CalcWSPortBinding">
<soap:address location="http://localhost:8085/calc"></soap:address>
</port>
</service>
</definitions> 


Now we are ready to test the newly created web service. Either you can go use the free SOAP clients available on the Internet like soap client or tools like wsimport (that comes with JDK) to generate wrapper classes to test a web service endpoint.

Now using the live web service and wsimport tool, let's generate some client classes. Run the following command from the root folder of the project.
wsimport -d bin -s test http://localhost:8085/calc?wsdl

The last step creates an interface Calc.....


package org.webservice.server;

import javax.jws.WebMethod;
import javax.jws.WebParam;
import javax.jws.WebResult;
import javax.jws.WebService;
import javax.jws.soap.SOAPBinding;


/**
 * This class was generated by the JAX-WS RI.
 * JAX-WS RI 2.1.6 in JDK 6
 * Generated source version: 2.1
 * 
 */
@WebService(name = "Calc", targetNamespace = "http://server.webservice.org/")
@SOAPBinding(style = SOAPBinding.Style.RPC)
public interface Calc {


    /**
     * 
     * @param arg1
     * @param arg0
     * @return
     *     returns float
     */
    @WebMethod
    @WebResult(partName = "return")
    public float div(
        @WebParam(name = "arg0", partName = "arg0")
        int arg0,
        @WebParam(name = "arg1", partName = "arg1")
        int arg1);

    /**
     * 
     * @param arg1
     * @param arg0
     * @return
     *     returns int
     */
    @WebMethod
    @WebResult(partName = "return")
    public int add(
        @WebParam(name = "arg0", partName = "arg0")
        int arg0,
        @WebParam(name = "arg1", partName = "arg1")
        int arg1);

    /**
     * 
     * @return
     *     returns int
     */
    @WebMethod
    @WebResult(partName = "return")
    public int list();

}
 

.....and a service class CalcWS


package org.webservice.server;

import java.net.MalformedURLException;
import java.net.URL;
import java.util.logging.Logger;
import javax.xml.namespace.QName;
import javax.xml.ws.Service;
import javax.xml.ws.WebEndpoint;
import javax.xml.ws.WebServiceClient;
import javax.xml.ws.WebServiceFeature;


/**
 * This class was generated by the JAX-WS RI.
 * JAX-WS RI 2.1.6 in JDK 6
 * Generated source version: 2.1
 * 
 */
@WebServiceClient(name = "CalcWS", targetNamespace = "http://server.webservice.org/", wsdlLocation = "http://localhost:8085/calc?wsdl")
public class CalcWS
    extends Service
{

    private final static URL CALCWS_WSDL_LOCATION;
    private final static Logger logger = Logger.getLogger(org.webservice.server.CalcWS.class.getName());

    static {
        URL url = null;
        try {
            URL baseUrl;
            baseUrl = org.webservice.server.CalcWS.class.getResource(".");
            url = new URL(baseUrl, "http://localhost:8085/calc?wsdl");
        } catch (MalformedURLException e) {
            logger.warning("Failed to create URL for the wsdl Location: 'http://localhost:8085/calc?wsdl', retrying as a local file");
            logger.warning(e.getMessage());
        }
        CALCWS_WSDL_LOCATION = url;
    }

    public CalcWS(URL wsdlLocation, QName serviceName) {
        super(wsdlLocation, serviceName);
    }

    public CalcWS() {
        super(CALCWS_WSDL_LOCATION, new QName("http://server.webservice.org/", "CalcWS"));
    }

    /**
     * 
     * @return
     *     returns Calc
     */
    @WebEndpoint(name = "CalcWSPort")
    public Calc getCalcWSPort() {
        return super.getPort(new QName("http://server.webservice.org/", "CalcWSPort"), Calc.class);
    }

    /**
     * 
     * @param features
     *     A list of {@link javax.xml.ws.WebServiceFeature} to configure on the proxy.  Supported features not in the features parameter will have their default values.
     * @return
     *     returns Calc
     */
    @WebEndpoint(name = "CalcWSPort")
    public Calc getCalcWSPort(WebServiceFeature... features) {
        return super.getPort(new QName("http://server.webservice.org/", "CalcWSPort"), Calc.class, features);
    }

}
 

Now let's run the test client CalcWSClient

package org.webservice.server;

import javax.xml.ws.WebServiceRef;


public class CalcWSClient {
      @WebServiceRef(wsdlLocation="http://localhost:8085/calc?wsdl")
      static CalcWS service = new CalcWS();

      public static void main(String[] args) {
        try {
            CalcWSClient client = new CalcWSClient();
          client.doTest(args);
        } catch(Exception e) {
          e.printStackTrace();
        }
      }

      public void doTest(String[] args) {
        try {
          System.out.println("Retrieving the port from the following service: " + service);
          Calc port = service.getCalcWSPort();
          System.out.println("Invoking the add operation on the port.");

          int response = port.add(1, 3);
          System.out.println(response);
        } catch(Exception e) {
          e.printStackTrace();
        }
      }
} 

The picture below shows the results on eclipse console.


Developing a RESTful web service


Using JAX-RS the API for REST based web service. There are a couple frameworks out there. The popular ones are Jersey and Apache CXF. This example was tested using Jersey 1.2 (you can download from jersey), the Sun's open source implementation.
Just with few annotations and some associated classes, Jersey lets you expose POJOs as web services. It also provides support for JSON.
You can find all the literature and code at jersey docs.

All the annotations are defined in jsr311-api.jar.
Here is a nice article about implementing REST in java. So in short RESTful architecture is about exposing resources and it's operations.
A resource class is a Java class with JAX-RS annotations to identify itself as a web resource.
The Root resource class used here is CalcWSImpl.java. It has three resource methods, add, div and list.
The code listing is shown below.

package org.rest.examples;

import javax.ws.rs.GET;
import javax.ws.rs.Path;
import javax.ws.rs.PathParam;
import javax.ws.rs.Produces;

import org.json.JSONException;
import org.json.JSONObject;

//The Java class will be hosted at the URI path "/calc"
@Path("/calc/")
public class CalcWSImpl {
    // The Java method will process HTTP GET requests
    @GET 
    @Path("add/{input1}/{input2}")
    // The Java method will produce content identified by the MIME Media
    // type "text/plain"
    @Produces("text/plain")
    public String add(@PathParam("input1") int a, @PathParam("input2") int b) {
        return String.valueOf(a+b);
    }
    
    @GET
    @Path("list/")
    @Produces("application/json")
    public String list() throws JSONException {
        JSONObject list = new JSONObject();
        list.put("mercedes", "20");
        list.put("porsche", "25");
        list.put("audi", "32");
        list.put("lexus", "35");
        return list.toString();
    }
    
    // The Java method will process HTTP GET requests
    @GET 
    @Path("div/{input1}/{input2}")
    // The Java method will produce content identified by the MIME Media
    // type "text/plain"
    @Produces("text/plain")
    public String div (@PathParam("input1") int a, @PathParam("input2") int b) {
        return String.valueOf(a/b);
    }
}


Some brief explanations of the annotations used...
@Path the URI path for a class or method. This is path you add to the base URL for the webservice to access the resource. For example http://localhost:9998/calc/list
@GET method will process HTTP GET methods
@Produces MIME media type of objects returned by a method
@PathParam parameters in the URI path like in the following URI http://localhost:9998/calc/add/6/7/
6 and 7 are parameters as you can see from the @Path annotation add/{input1}/{input2} for the add method.
To find all the JSR-311 annotations refer to JAX-RS annotations
Now to get going we would need the following jars
asm-3.1.jar
jersey-bundle-1.2.jar
jsr311-api-1.11.jar
json.jar
You can download them from here.


We are ready to launch the webservice. Let's look at Main.java 

package org.rest.examples;

import com.sun.net.httpserver.HttpServer;
import com.sun.jersey.api.container.httpserver.HttpServerFactory;
import java.io.IOException;

public class Main {
    
    public static void main(String[] args) throws IOException {
        HttpServer server = HttpServerFactory.create("http://localhost:9998/");
        server.start();
        
        System.out.println("Server running");
        System.out.println("Visit: http://localhost:9998/list");
        System.out.println("Hit return to stop...");
        System.in.read();
        System.out.println("Stopping server");   
        server.stop(0);
        System.out.println("Server stopped");
    }
    
    
} 
Run Main.java from eclipse as a java application. You have a running web service.

Let's try some examples here using curl.
~$ curl http://localhost:9998/calc/add/6/7/
13
 ~$

~$ curl http://localhost:9998/calc/list
{"lexus":"35","audi":"32","porsche":"25","mercedes":"20"}
~$ 
 
Deploying...
Let's deploy to a servlet container other than Tomcat :-) , Jetty for instance.
here is what the web.xml should look like.


<?xml
version="1.0"
encoding="UTF-8"?>


<!DOCTYPE web-app PUBLIC "-//Sun Microsystems, Inc.//DTD Web Application 2.3//EN" "http://java.sun.com/dtd/web-app_2_3.dtd">
<web-app>
<servlet>
<servlet-name>JerseyTest</servlet-name>
<servlet-class>
com.sun.jersey.spi.container.servlet.ServletContainer
</servlet-class>
<init-param>
<param-name>com.sun.jersey.config.property.packages</param-name>
<param-value>org.rest.examples</param-value>
</init-param>
<load-on-startup>1</load-on-startup>
</servlet>
<servlet-mapping>
<servlet-name>JerseyTest</servlet-name>
<url-pattern>/*</url-pattern>
</servlet-mapping>
</web-app>
With jersey configured as a servlet.
All we are doing here is providing the package name (“ org.rest.examples”) which has resource classes.
We need another class to instantiate Jetty! Yes we are going to start an embedded instance programmatically. Here is RunServlet.java

package org.rest.examples;

import org.mortbay.jetty.Server;
import org.mortbay.jetty.webapp.WebAppContext;

public class RunServlet {

    public static void main(String[] args) throws Exception {
        Server server = new Server(8081);
        
        WebAppContext context = new WebAppContext();
        context.setParentLoaderPriority(true);
        context.setDescriptor("./src/web/WEB-INF/web.xml");
        context.setResourceBase("./src/web");
        
        server.setHandler(context);
        
        server.start();
        server.join();
        
    }

} 

Need the following Jetty jars to be in the classpath.
jetty-6.1.18.jar
jetty-util-6.1.1.18.jar
servlet-api-2.5-20081211.jar

On running RunServlet, see the console output below. The JerseyTest servlet scans the package org.rest.examples and finds HelloWorld and CalcWSImpl resource classes.


Now let's see how it works.

All you need is just a few jars and resource classes and you are done creating a RESTful web service! Couldn't be easier than this.

Conclusions:
As you can see, with frameworks like Jersey writing/deploying/testing REST based web services is much simpler and straight forward than it's SOAP equivalent. But of course SOAP has many more features that you may or may not need. So depending on your internal computing environment and external client needs you can choose SOAP or put everything to REST!

Wednesday, February 24, 2010

Finding process/program using a port

Many a times you would get a "Bind Exception", "Address already in use" kind of errors and need to find the process that's using the port. For example say the port is 8080. The following command will get you the pid and program name as well.

netstat -nlept | grep "8080"

The result might look something like this...

Proto Recv-Q Send-Q Local Address           Foreign Address         State       User       Inode       PID/Program name
tcp6   0           0          :::8080                        :::*                              LISTEN      1000       994652    4024/java  
Where 4024 is the pid and it's a java app.

Tuesday, February 2, 2010

Upgraded process manager for Linux

Check this out htop which is a more interactive and intuitive upgrade of the good old 'top' has many pluses to it like Color themes, mouse enabled and so on.

Monday, January 4, 2010

XML parsing in Java and Groovy

XML is everywhere. Somebody said that XML is like violence. if it doesn't work for you then you are not using enough of it! Well like it or not you have to deal with XML everywhere. To say that XML handling in java is not easy is an understatement. What if you have to deal with SAX, DOM parsers, etc. Well there are some libraries out there which make the job a little easier. Like XOM, XSTREAM, etc. But what if you want to read an XML config file into a Java object?

XSTREAM has a fairly simple way of doing that. Here is an example.

One other option is to look at the many jvm based languages like groovy, scala, jruby, etc. They all handle XML super easy. Let's see How easy it is in Groovy.
Groovy has two APIs XMLParser and XMLSlurper for dealing with XML.

Groovy lets you easily cut to the metadata instead of going through each node and getting the child and more.
Using a scripting language gives you a tradeoff for complexity and since it is run by the same jvm you don't loose any performance either. A call to groovy functionality can be embedded in java or invoked through a shell. That way any scripting language can be used.

The example here uses a simple xml data file (Cars.xml) shown below.

<records>
<carList>
      <car name='HSV Maloo' make='Holden' year='2006'>
        <country>Australia</country>
        <record type='speed'>Production Pickup Truck with speed of 271kph</record>
      </car>
      <car name='P50' make='Peel' year='1962'>
        <country>Isle of Man</country>
        <record type='size'>Smallest Street-Legal Car at 99cm wide and 59 kg in weight</record>
      </car>
      <car name='Royale' make='Bugatti' year='1931'>
        <country>France</country>
        <record type='price'>Most Valuable Car at $15 million</record>
      </car>
</carList>
</records>

The data structure to represent the XML data is defined in
Records.java.

package org.xml.example;

import java.util.List;

public class Records {
 private List carList = null;
 
 public static class Car {
  String name;
  String make;
  String year;
  Country country;
  Record record;
  
  public static class Record {
   String type;
   String info;
   
   public String toString(){
    return "Record type:" + type + ", info:" + info;
   }
  }


  public static class Country {
   String name;
   
   public String toString(){
    return "Country: " + name;
   }
  }
  
  public String toString(){
   return "name: " + name + ", make:" + make + ", year:" + year + " " 
   + country + " " + record;
  }
 }
 
 public List getCars() {
  return carList;
 } 
 
 public String toString(){
  StringBuilder sb = new StringBuilder();
  for (Car car : carList) {
   sb.append(car.toString());
   sb.append(System.getProperty("line.separator"));
  }
  return sb.toString();
 }
}

The main program is XMLParseExample.java.

package org.xml.example;

import groovy.lang.Binding;
import groovy.util.GroovyScriptEngine;

import java.io.FileNotFoundException;
import java.io.FileReader;

import com.thoughtworks.xstream.XStream;

public class XMLParseExample {

    public static void main(String[] args) throws FileNotFoundException {
//        parseXMLinGroovy();
        parseXMLinXstream();
    }

    private static void parseXMLinXstream() throws FileNotFoundException {
        XStream xstream = new XStream();
        
        xstream.aliasType("records", Records.class);
        xstream.aliasType("car", Records.Car.class);
        xstream.useAttributeFor(Records.Car.class, "name");
        xstream.useAttributeFor(Records.Car.class, "make");
        xstream.useAttributeFor(Records.Car.class, "year");
        xstream.aliasType("country", Records.Car.Country.class);
        xstream.aliasType("record", Records.Car.Record.class);
        xstream.useAttributeFor(Records.Car.Record.class, "type");
                
        Records records = (Records)xstream.fromXML(new FileReader("/home/csrinivasan/Documents/Nigeria/Cars.xml"));
        String xml = xstream.toXML(records);
        System.err.println(xml);
    }

    private static void parseXMLinGroovy()  {
        String[] roots = new String[] { "./scripts/" };
        GroovyScriptEngine gse;
        try {
            gse = new GroovyScriptEngine(roots);
            Binding binding = new Binding();
            gse.run("ParseXML.groovy", binding);
        } catch (Exception e) {
            e.printStackTrace();
        }
    }
}

The groovy script is ParseXML.groovy.

import org.xml.example.*;
import org.xml.example.Records.Car.*

class ParseRecords {
    private List cars

  ParseRecords () {
      cars = new ArrayList()
  }

  def parseRecords() {
    ClassLoader sysClassLoader = ClassLoader.getSystemClassLoader()
      def data = sysClassLoader.getResource("Cars.xml").text
      def xmlSlurper = new XmlParser()
      def records = xmlSlurper.parseText(data)
      Records recs = new Records()
    records.carList.each {
        recs.carList = new ArrayList()
        it.car.each {
            Records.Car car = new Records.Car()
            car.name = it.attribute("name")
            car.make = it.attribute("make")
            car.year = it.attribute("year")
            car.country = new Records.Car.Country()
            car.country.name = it.country.text()
            car.record = new Records.Car.Record()
            it.record.each {
                car.record.type = it.attribute("type")
            }
            car.record.info = it.record.text()
            recs.carList.add(car)
        }
    }
    println recs
  }

ParseRecords algConfig = new ParseRecords()
algConfig.parseRecords()